Today I will be guiding you through one of the more recent features within Google AdWords called Gmail Sponsored Promotions (GSP). GSP is a way of targeting users based on their Gmail account activity. GSP previously lived in their own UI, but Google realised how successful a platform it was and recently released it from Beta to all advertisers – which means that everyone can now have a play!
This guide will cover the advert layout, targeting options, top strategies, how to set up a campaign in Google AdWords and tips to get you started.
Advert Layout
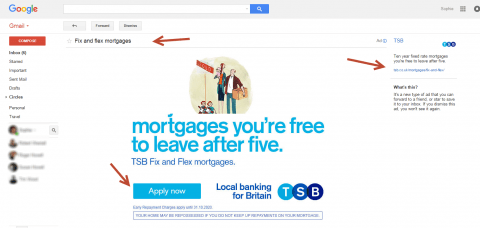
The Gmail advert is set out in two sections in the Gmail inbox – a collapsed ad and an expanded ad, but essentially this is the same advert. The collapsed ad appears as a ‘new message’ in your inbox and when you click on it, this then leads you to another ad – the expanded ad. You pay for the cost per click (CPC) every time somebody clicks on the collapsed ad. The expanded ad then leads the user to your landing page; however, you do not pay for the click from the expanded ad to the landing page (this is free).
The screenshots below are taken from my personal Gmail account to show you the layout. It’s quite clever really; as you can see there are two adverts targeting my search history – mortgages and mobile phone companies – so it’s an extremely personalised method of targeting!
Collapsed Ad

Expanded Ad
Targeting Options
There are many targeting options you can select when using GSP, including the use of keywords, topics, interests, Customer Match and demographics.
Advertisers were previously able to target based on recent purchases made by the user and their job title. However, this feature was removed when GSP moved from the independent UI to the standard AdWords interface.
Top Strategies
The best strategy to use – which many people are getting excited about – is to bid on your competitors’ domains by uploading them into the keywords section. This means that your ads will appear to those who are receiving e-mails from your competitors. Be prepared to bid aggressively and tweak bids to gain impressions using this strategy, as there will be a lot of competition now GSP’s out of beta.
Another great strategy is to target the domains that have the same target market as you, but are not necessarily competitors. For example, if you owned a garden machinery company, you could target gardening magazines’ domains, as you would both share a very similar audience. This is another fantastic way to place your ads in front of the right audience.
Google has recently released Customer Match, which is another effective strategy to use. For Gmail ads, this works by uploading a customer’s e-mail addresses to a campaign in order to make your ad pop up in your customer’s Gmail inbox (sneaky I know!). Check out Dean’s post on Customer Match to find out more about this.
It’s important to try different strategies to find the one that works best for your business. Utilise the targeting options including keywords/topics alongside the Gmail placement.
One thing to note with these strategies is that you shouldn’t try to use the targeting methods too narrowly: if the targeting is too granular you won’t gain enough traffic. For example, you do not want to be targeting topics on top of keywords and the Gmail placement, as your targeting would be too narrow. Try to stick to using the Gmail placement and one other targeting method per campaign.
How Do I Create A GSP Campaign?
Now to the fun part that will help you get started – setting up your first GSP campaign!
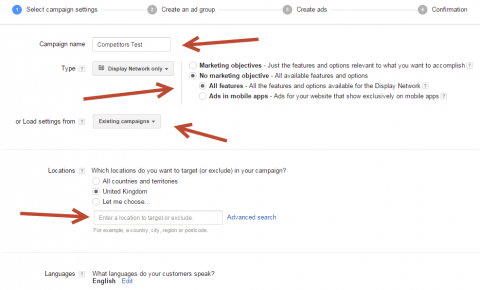
First of all, you need to make sure you have a Google AdWords account. When you have filled in the relevant details, you can start to build your campaign. Select “Campaigns”, then “Display Network only”.

From here, you need to name your campaign and select “Display Network only” (ensure all features are ticked) and you can also choose to upload settings from your existing Display Network campaigns to save time. You then choose the locations you want to include and exclude, and the language you are targeting.
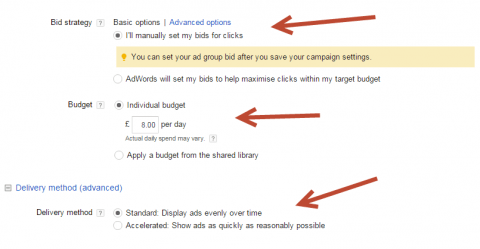
Choosing the bid strategy is the next step. I would normally advise starting out with the basic options and selecting the option “I’ll manually set my bids for clicks”; this is so I have more control over how much I want to bid, rather than letting Google run away with my money! When your campaigns are live and accumulating over 15 conversions a month, you can explore the “Advanced Options” and turn on “Enhanced CPC” to increase your conversions.
You then need to set the budget for the campaign. If your campaign is limited by budget, the best strategy is to initially set your budget low and increase it as time goes on. However, if you start out by using the competitor domain strategy, be prepared to spend a little more than the average Display Network campaign, as this can be competitive. You can set your delivery method to “Standard: Display ads evenly over time” to conserve your budget.
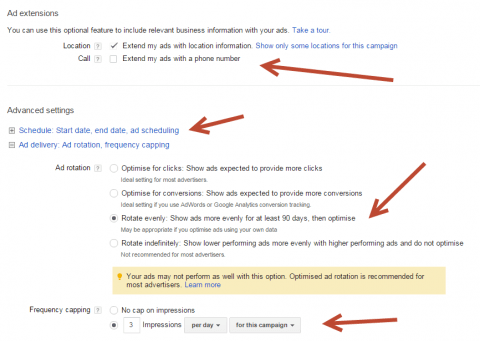
I recommend using Ad Extensions in all campaigns, even if they may not appear half of the time. So ensure you fill out the Location and Call extensions, as this is great for increasing your click-through rate (CTR). For the ad schedule, choose the days and hours you want your ads to run. Ad rotation needs to be changed to “Rotate evenly”, as you will be split testing your ads to find the best ad text variations.
Frequency capping is where you cap the number of times somebody sees your ad. It’s always best to set a frequency cap in your campaigns to limit unwanted impressions. I generally aim for three impressions a day per campaign, but this depends on your business model and what you are selling. Another way to set your frequency capping is by using the reporting in Google Analytics to see how many visits it usually takes for someone to convert.
The last options can be left as they are unless you have any specific requirements.

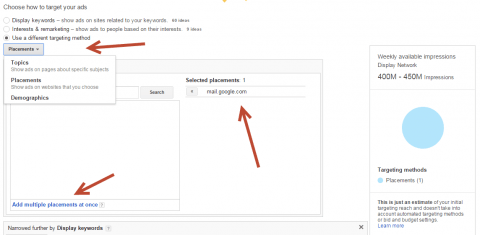
From here, you can save and continue, and then create and name the first ad group. You could split your ad groups up by naming them after different sections of your business. For example, for Koozai there could be a “Digital Marketing” campaign and another for “PPC”. This can also be reflected in your ad creative. We then go on to select our targeting options. Select your Gmail placement under “Use a different targeting method” and add the website mail.google.com.
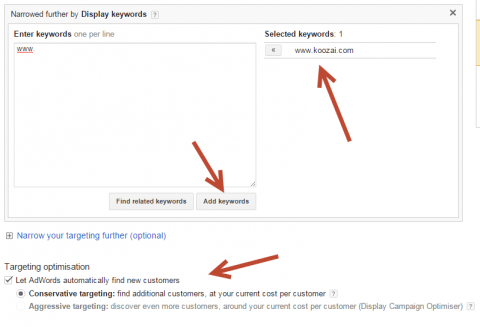
Select the option “Narrow your targeting further (optional)”, then “Display keywords” and add in the domains or keywords you are targeting. If you want to use other methods of targeting, you can do this here too.

Make sure you select “Conservative Targeting”, which lets AdWords automatically find new customers. Click “Save and continue”.
Once you have saved this part, you’ll come to creating the ads. However, you need to skip this part as AdWords hasn’t integrated creating ads into this section of the set up yet. Continue to confirm the campaign.
Now the creative part – actually making your ads! Dive back into your campaign, select “Ads” and then “Ad Gallery”.

Select “Gmail Ads”.

You have four options to choose from. I would advise starting with the simplest template “Gmail image template” which is essentially a big banner ad that targets one landing page. I would also recommend testing the “Gmail single promotion template”, which includes a call to action button for you to add in an additional landing page. The last two options are for more advanced features. The “Gmail multi-product template” creates an ad unit similar to an e-commerce category page that displays multiple products and links out to different landing pages. The “Gmail custom HTML upload” option allows you to embed videos, forms and click-to-call capabilities and must be formatted as a zip file.

If you were to select the “Gmail image template”, it would look like the example below. Name your ad, choose your display URL and destination URL. Upload your logo (or you can be creative with this and upload a different design) and upload your main image. Remember to include a call to action in your ad text and image.
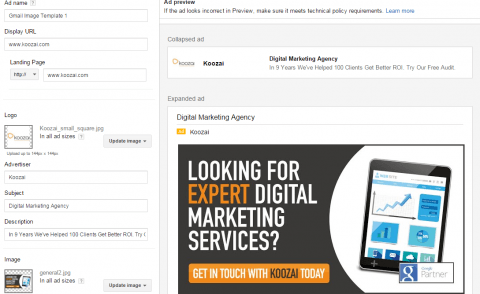
After you’ve saved this, create another ad to split test against your original ad and you’re ready to rock!
Tips
I will now go through some of the best practices to take into consideration when running your GSP campaigns.
Gmail Reporting Columns
Enable the Gmail reporting columns in order to measure your campaigns accurately. The options are “Gmail saves” (when somebody saves your ad to the inbox as if it were a real message), “Gmail forwards” (which shows the number of times somebody forwards your ad on to somebody else as a message) and finally “Gmail clicks to website” (which indicates the number of clicks that go through to your landing page). It is vital to track the “Gmail clicks to website”, as this is essentially your real Cost per Click (CPC). The CPC recorded in AdWords for Gmail Ads relates to the Cost per Click on the initial collapsed ad.

Be Creative
Optimise the ad image by split testing against another ad, or if you need calls to your business, add your phone number to the expanded ad image. The “Advertiser” and “Logo” sections don’t need to be filled in exactly as they are – you can be imaginative with what you upload. Gmail Ads allows you to be creative with text and images – so make the most of it!
Exclusion Types
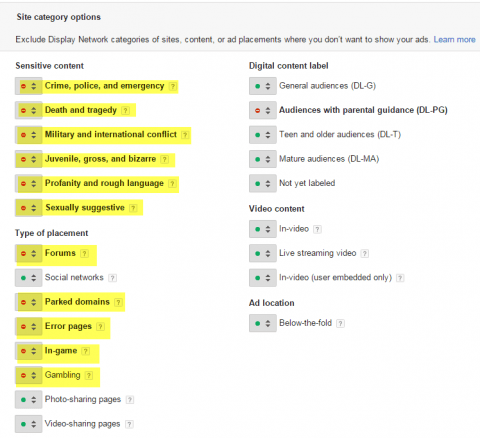
Use exclusion types, which can be found under “targeting” in your campaigns. You could exclude certain keywords or topics depending on what campaign type you have set up. Don’t go too wild on this, as your targeting is narrow as it is! Site category options are also best to review and switch off, in particular “Parked domains”, “Error pages” and “Gambling”, as in the example below:
Desktop
Start your campaign by targeting desktop users only by setting a bid adjustment of -100% on mobile in the devices section. This will save costs in the beginning – after a few months you can then test whether mobile devices are worth having switched on.
Target and Bid
Within the targeting settings, always make sure you choose the option “Target and Bid” when selecting your targeting options. This is because you want your ads to show based on your targeting selections – especially the Gmail placement, as otherwise your ads won’t show.
Frequency Capping
Remember to set your frequency capping, like you do in your remarketing campaigns. You don’t want to waste too many impressions on a person who may be getting fed up of seeing your ad!
Embedded YouTube Video
If you have a relevant video, make sure you include this by embedding your YouTube video into the ad. This will improve performance and expand the reach of your video.
There we have it – your complete guide to Gmail Sponsored Promotions Ads. If you have any questions, please feel free to contact me on the social profiles below or alternatively contact Koozai for help on setting up your Gmail Sponsored Promotions campaigns.

Leave a Reply