 The Google Display Network (GDN) is responsible for 20% of all AdWords traffic, and it is an ever-growing advertising platform. In the US alone, the GDN reaches 92% of all Internet users. This post will guide you step-by-step through the different kinds of display targeting and how to set up your display campaigns. It will also cover some basic optimisation tips so you can make sure you’re getting the most out of Google AdWords Display Advertising.
This post does not cover Remarketing, however if you would like to learn about Remarketing you might want to look at this post or this one.
Why would you use display advertising?
Display advertising is great if your advertising goal is to achieve brand awareness, or achieve a wide reach, rather than to achieve a direct response such as conversions.
It is also very affective if one of the USP’s of your product is visual. For example seeing an image of a beautiful sandy beach with crystal clear waters might be more affective at promoting your luxury holidays than a simple text ad.
The display network is not as effective at delivering high Click through Rates and volumes of visitors to a website, so if this is your only goal then the Search network might be best for you.
Having said this, the best results I have experienced with GDN have come from using display and search advertising, so that display creates awareness and then search is there to convert that awareness into an action once the awareness has been built.
Types of AdWords Display Targeting
First we’ll go over the different kinds of targeting you can use with AdWords display advertising, so you can decide which one suits your needs best.
Automatic Placements using Contextual Targeting
Automatic placements are when you allow Google to determine where your display ads will be shown. You should use contextual targeting with this method of display advertising, so that you can narrow down the kind of content where your ads will feature.
Contextual targeting works with keywords and / or topics, which you add to your ad groups. Google then determines where to show your ads based on whether the theme of the content on a web page matches the theme within your keywords / topics in your ad groups.
Topic targeting is most suitable if you have a larger budget.
Managed Placements (and contextual targeting)
Managed placements give you much greater control over your display advertising, by allowing you to select exactly which sites you would like your ads to appear on.
You can then further your targeting also using keywords or topics to determine which kinds of pages on those sites your ads should be served on. For example if you were targeting the Huffington Post you might want to use keywords which mean your ads will appear on content with a theme related to that of your keywords, for example tech or celebrity.
You can also control your bids individually and bid higher for placements which perform best with managed placements.
There are tools such as the GDN Display Ad Planner which will give you ideas of placements to add to your campaigns.
Use both Automatic and Managed Placements for best results
If you are just starting out with display advertising, I would recommend you have a campaign for automatic placements, and another one for managed placements. You can then let your ads run on automatic placements using contextual keyword targeting and view the automatic placement report to see where your ads are showing and which sites work best. You can add these sites as managed placements within your ‘managed placements’ campaign along with the same contextual keyword targeting and increase your bids so they have a better chance of being served.
Demographic Targeting (age / gender)
Demographic targeting should be used in conjunction with another targeting type like keywords or topic contextual targeting. If your product suits a particular demographic you can select this in addition to your other targeting. Likewise if there are particular demographics which aren’t applicable for your product you can exclude them. You can also increase your bids for specific demographics which might be particularly relevant for your product.
Interest Category Targeting
This is different to ‘topic’ targeting because it’s based on the interests of the user rather than the topic of the content. Like demographic targeting I would recommend using this in conjunction with another contextual targeting method such as keywords or topics.
Billing Preferences
You can chose to pay per click for display advertising (CPC bidding) or you can chose the CPM option where you pay per thousand impressions. From experience I would recommend the CPC bidding option for display, as this seems to be more cost effective. Having said this, Google’s official recommendation is that if you are focused on gaining a wide reach rather than clicks, then you should use their CPM model. Google also recommend that you bid higher for CPM ads than you would for CPC ads because they occupy more space.
How to structure your campaigns
The way you structure your campaigns is going to be determined by your strategy. All display advertising campaigns should only be for display (ie don’t mix search and display advertising in one campaign). This allows you to have greater control over your spend and campaign performance.
The guide below is based on having one campaign for managed placements, and another campaign for managed placements.
How to Create Your AdWords Display Ads
Having your display ads made before you create your campaigns will allow you to finalise the campaigns and upload the ads all in one go.
If you have the resources to create your own display ads you should do the following:
- Create static (eg jpeg) ad formats of each creative in addition to animated ads if you are choosing to use animated ads too (this is so your ads can show on sites where animated formats aren’t supported). A list of all available formats you can chose from can be found here.
- Create one of every ad size variation for each ad creative (this ensures your ads have the opportunity to show for all ad sizes available on a placement) A list of all image ad formats can be found here.
- Ensure your ad complied with Google’s display ad policies.
You should include a clear call-to-action or branding message within your ads and consider using a creative design that has continuity with the design of your own website.
You may wish to create a set of ads with specific creative based on your ad groups, for example an ad creative promoting dresses, and then another ad creative promoting shoes. Each ad creative needs to be designed in each different ad size and in a static an animated format if you chose to animated ads.
You can also use Google’s Display Ad Builder to create display ads easily if you don’t have the resources to create your ads yourself.
Creating your Automatic Placement Display Campaign using Keywords
Use AdWords Editor to create the campaign as normal:
1. Go to the campaigns tab, and click +Add Campaign, then chose whether you are going to use CPC or CPM bidding. This example uses CPC:

2. Name Your Campaign including something to indicate that it’s a display campaign and it’s your automatic placement campaign, for example ‘GDN – Auto Placements’
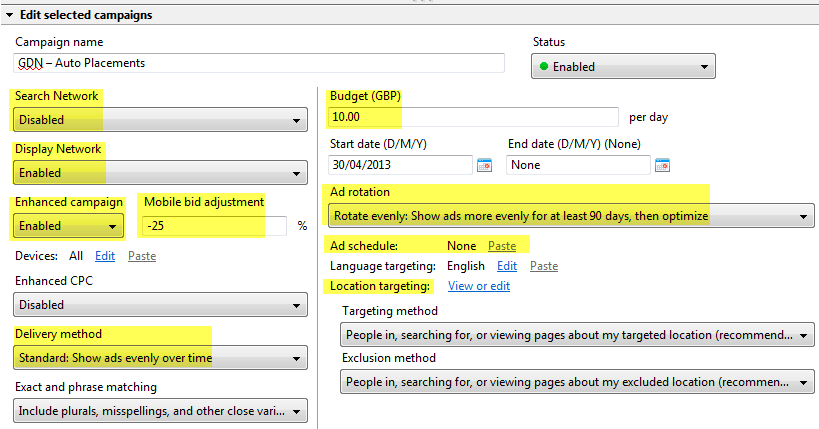
3. Ensure your settings comply with the example below:
-Search network disabled
-Display network enabled
-Enhanced campaign enabled
-Delivery method: evenly over time
-Ad rotation: rotate evenly for 90 days then optimise (so that you can conduct split testing if you wish)
-If you are planning to target mobile devices in your campaign, you should select a mobile bid adjustment at campaign level (soon this will be possible at ad group level), for example -25%
-If your product is location specific then select location targeting as required
-If you already have an idea of the ad scheduling you would like to use then apply this now too, for example 7am to 11pm
-Set your budget as you wish
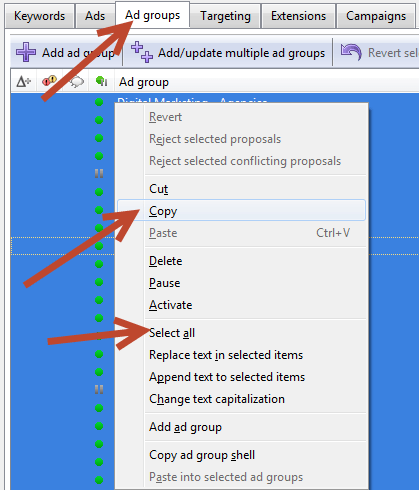
4. If you have an existing search campaign, you can simply copy over your search ad groups into your display campaign to act as your keywords for contextual targeting. You can do this by going to the ad groups tab whilst in your existing search campaign and selecting all ad groups, then copying them:
5. Now go to your new display campaign and paste them in:

6. Match type of keywords doesn’t matter when used for contextual targeting in AdWords display advertising, so you can remove all match type variations of keywords so you are only left with one of each keyword.
7. Delete all the text ads which will have been copied into the campaign by going to the ads tab when you are at the top level campaign name, select all and then delete:

8. You can now upload your image ads to each ad group accordingly. Upload each ad creative to its relevant ad group, for example your ‘Shoes’ ad creative should be uploaded to your ‘Shoes’ ad group. One of every ad size should be in each ad group.
You can upload your ads by going to the ad group you require, then the Image tab within the main Ads tab, and clicking Make Multiple Changes and Add/Update Multiple Image Ads, and then uploading your ads from wherever you have saved them on your computer.

If you used AdWords Display Ad Builder this step may be different for you, however the display ad builder provides detailed instructions as you go along so this will be explained step by step.
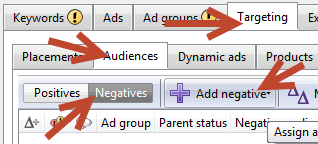
9. If you would like to add Audience interests as a second form of targeting within the campaigns, you can do this within AdWords Editor by being on your selected ad group, then going to the Targeting tab, and then the Audiences tab below that, and clicking Assign Audience. A pop-up box will appear with a list of Interest categories for you to choose from:

10. If there are particular interests you want to exclude from your targeting because your audience are likely not to be interested in them, you can follow the same process as outlined in the step above but by clicking the Negatives sub tab before you start:
11. You can now click Post Changes in AdWords Editor and your campaign will be live.
12. If you want to add topics as well as keywords and / or interests, you can do this in the AdWords interfact now the campaign is live. Go to the ad group you want to add the topic to, then the Display Network tab and the Topics sub-tab below that, you then need to click +Change Display Targeting

13. A box will then pop up for you to pick topics from. Make sure you have ticked the option just below the box which says ‘Bid only: Add these topics so I can set bids on them, but show ads when my other targeting methods match’ so that you can use bid adjustments for this method of targeting when an ad is served based on this targeting method.
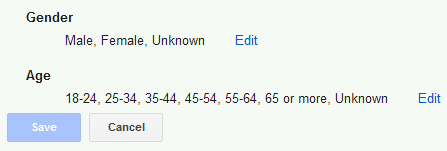
14.If you want to also target using age and gender (demographic targeting) then this can be found here too when you scroll further down the page.
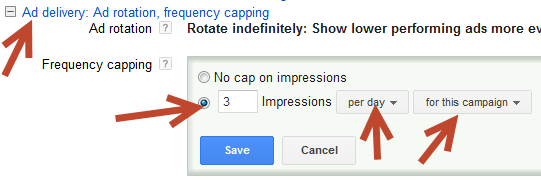
15. Frequency capping settings should be adjusted to ensure your campaigns do not bombard users with your ads too often. Go to the campaign within the AdWords user interface, and then click the settings tab. I would recommend a frequency cap of 3 impressions per day per campaign to start with, however you can change this in the future.
Creating your Managed Placements Campaign
Now that your automatic placement campaign is live, you should create a managed placement campaign so that you can add successful placements here and manage bids for them.
1. Go to AdWords Editor and then create a copy of your Automatic Placements campaign. You can do this by going to the campaigns tab and then simply coping and pasting the first display campaigns.
2. Change the name of your new campaign so that it states that it is a managed placement campaign, rather than an automatic placement campaign for example ‘GDN – Managed Placements’
3. Adjust your budget as you wish. All other settings will be in place from the original campaign.
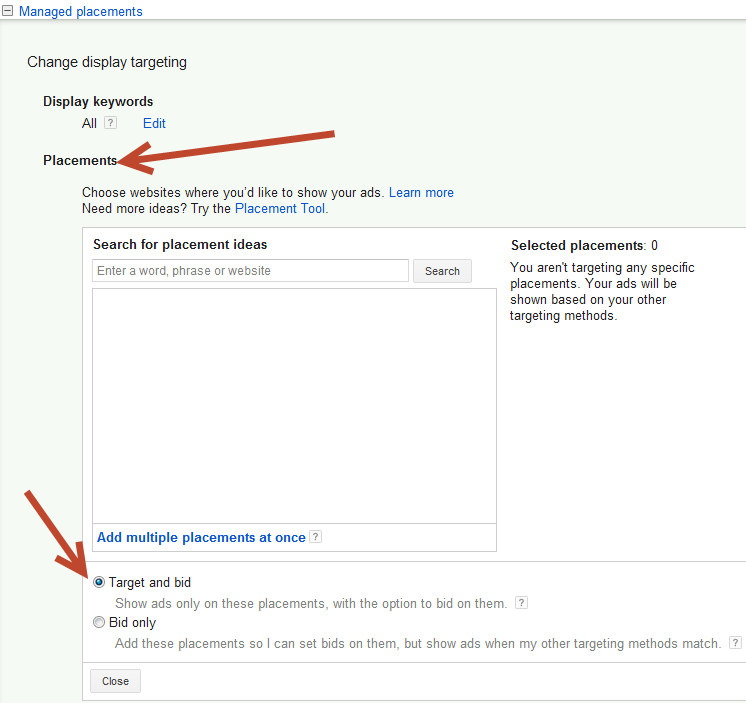
4. Once you have posted the campaign so that it is live, you should immediately go to the Display Network tab for that campaign, and then the Placement sub-tab, where you need to click +Change Display Targeting:

5. A box will pop up which contains some settings for your targeting types. Go to the heading called ‘Placements’ and scroll down to where you see a tick option for ‘Target and Bid’: Show ads only on these placements, with the option to bid on them.’. This ensures that this campaign only serves ads based on your placements targeted and does not serve ads to automatic placements:
Reviewing your Automatic Placement Report & adding Placements to your Managed Placements campaign
To see which sites your ads work well on, you should review your automatic placement report and then add them to your managed placement campaign as follows:
1. Go to your automatic placement campaign in the AdWords Interface, and then the Display Network tab, and then the Placements sub-tab:

2. You can then scroll down the page to where you will see the heading ‘Automatic Placements’ and a table which states where your ads have appeared and which ad group they have been served from. Please note that it takes up to 48hrs to see this data after you’ve made your automatic placement campaign live:

3. You can then see which websites are particularly relevant or perform well (eg relevant topic, higher than average CTR, produced a conversion)
4. Make a note of these sites and which ad group these were triggered by
5. Open AdWords Editor and navigate to your Managed Placements display campaign
6. Go to the targeting tab, and the Placements sub-tab (make sure you are on ‘positives’ and then click ‘Add Placement’ (if you have lots of placements to add to a particular ad group or are adding the same placement to several ad groups then you can click ‘Make Multiple Changes and add them all at once):

7. You will need to do this for each placement that needs to be added to each ad group (if you can learn how to use the ‘Make Multiple Changes’ feature I mentioned above this will be much quicker for you.
8. Once your placements have been added you can adjust their Max CPC bid to a level you want depending on how successful or relevant the placement is, and also select specific landing pages on your site:

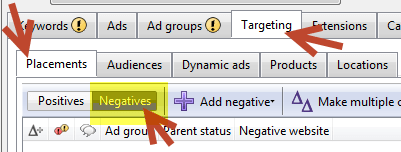
9. You now need to add all of the sites you added as managed placements, as negative placements for each associated ad group in your automatic placement campaign. This ensures your placements are not still served automatic placement ads.
You can do this in the same way you added your placements above, however you need to be in your automatic placements campaign, and ensure you move to ‘negatives’ when you add the placement. Make sure you only add the negative to the ad group which you added it to as a positive placement in the other campaign. You don’t want to block that placement from all ad groups unless you have added it to all ad groups in your other managed placement campaign.
Optimising your Display Network Campaigns
The main method of optimisation for display campaigns is regular reviewing of the automatic placements report, and adding strong performing placements to your managed placement campaigns.
You should also add any irrelevant or poor performing sites as negative placements in your automatic placement campaign. You can do this in the same way you added negative placements explained above.
You can also try the following for optimising your display campaigns:
- Exclude irrelevant categories
- Exclude irrelevant audiences
- Review your reach (within the dimensions tab) and increase your budget if you wish to increase your reach
- Review impression share lost due to rank (add it as a column to your standard table) and increase your bids if you want to improve your rank and gain more impression share
- Review the performance of your ads by time of day (dimensions tab) and adjust your scheduling accordingly. You can also add custom bid adjustments based on your scheduling in your managed placement campaign.
- Review your ad performance based on geographic region and exclude any areas which are irrelevant / perform poorly (dimensions tab)
- Adjust mobile bid preferences
- Add social extensions to your display campaigns
- Add click-to-call extensions if you are targeting mobile devices
These are some basic optimisation tips for the display network, but there are lots more other things you can do to continually improve the performance of your display advertising campaigns. If you’ve got any comments or questions please leave them in the comments section below.
Image Credit:
Vector photo frames are hanging in a row from Bigstock.


Leave a Reply